Monday, July 16, 2012

PostgreSQL: Database Creation & Administration


Database Cluster
-        a database storage area on disk. (SQL uses the term catalog cluster.)
-       a collection of databases that is managed by a single instance of a running database server.
-       After initialization, a database cluster will contain a database named postgreswhich is meant as a default database for use by utilities, users and third party applications.
-       Another database created within each cluster during initialization is called template1. As the name suggests, this will be used as a template for subsequently created databases; it should not be used for actual work.
-       In file system terms, a database cluster will be a single directory under which all data will be stored. We call this the data directory or data area.
-       Initdb : To initialize a database cluster


Creating a Database Cluster

-bash-3.00$ initdb -D /u01/postgres/postgres/9.0-pgdg/data
The files belonging to this database system will be owned by user "postgresql".
This user must also own the server process.

The database cluster will be initialized with locale C.
The default database encoding has accordingly been set to SQL_ASCII.
The default text search configuration will be set to "english".

creating directory /u01/postgres/postgres/9.0-pgdg/data ... ok
creating subdirectories ... ok
selecting default max_connections ... 100
selecting default shared_buffers ... 32MB
creating configuration files ... ok
creating template1 database in /u01/postgres/postgres/9.0-pgdg/data/base/1 ... ok
initializing pg_authid ... ok
initializing dependencies ... ok
creating system views ... ok
loading system objects' descriptions ... ok
creating conversions ... ok
creating dictionaries ... ok
setting privileges on built-in objects ... ok
creating information schema ... ok
loading PL/pgSQL server-side language ... ok
vacuuming database template1 ... ok
copying template1 to template0 ... ok
copying template1 to postgres ... ok

WARNING: enabling "trust" authentication for local connections
You can change this by editing pg_hba.conf or using the -A option the
next time you run initdb.

Success. You can now start the database server using:

    postgres -D /u01/postgres/postgres/9.0-pgdg/data
or
    pg_ctl -D /u01/postgres/postgres/9.0-pgdg/data -l logfile start

-bash-3.00$
Alternatively, you can run initdb via the pg_ctl program like so:
$ pg_ctl   -D    /u01/postgres/postgres/9.0-pgdg/data   initdb


Best practice:
root# mkdir /usr/local/pgsql/data
root# chown postgres /usr/local/pgsql/data
root# su postgres
postgres$ initdb -D /usr/local/pgsql/data


Starting/stopping Database Server/Cluster

Command to start:  pg_ctl -D /u01/postgres/postgres/9.0-pgdg/data -l logfile start
                                  pg_ctl -D /u01/postgres/postgres/9.0-pgdg/data start

Command to stop:  pg_ctl -D /u01/postgres/postgres/9.0-pgdg/data -l logfile stop
                                   pg_ctl -D /u01/postgres/postgres/9.0-pgdg/data -m f stop

Starting/stopping with a different port:
In postgresql.conf file
listen_addresses = '127.0.0.1'  
port = 5433
Localhost does not work here

Also, put PGPORT = 5433 in .bash_profile

pg_ctl -D /u01/postgres/postgres/9.0-pgdg/data –m f stop
pg_ctl -D /u01/postgres/postgres/9.0-pgdg/data -o "-F -p 5433" start

-bash-3.00$
-bash-3.00$
-bash-3.00$ ps -ef|grep postgres
postgres 21992 21565   0 18:56:22 pts/1       0:00 grep postgres
postgres 21991 21565   0 18:56:22 pts/1       0:00 ps -ef
postgres 21565 21534   0 18:55:18 pts/1       0:00 -bash
postgres 21534 21533   0 18:55:07 ?           0:00 /usr/lib/ssh/sshd
-bash-3.00$
-bash-3.00$
-bash-3.00$ pg_ctl -D /u01/postgres/postgres/9.0-pgdg/data -l logfile start
postmaster starting
-bash-3.00$
-bash-3.00$
-bash-3.00$ ps -ef|grep postgres
postgres 22044 21565   0 18:56:39 pts/1       0:00 ps -ef
postgres 22045 21565   0 18:56:39 pts/1       0:00 grep postgres
postgres 21565 21534   0 18:55:18 pts/1       0:00 -bash
postgres 21534 21533   0 18:55:07 ?           0:00 /usr/lib/ssh/sshd
-bash-3.00$
-bash-3.00$
-bash-3.00$ echo $PATH
/usr/bin:/opt/EMCpower/bin:/etc/emc/bin:/etc
-bash-3.00$
-bash-3.00$ cd /u01/postgres/postgres/9.0-pgdg/bin/64/
-bash-3.00$
-bash-3.00$ pwd
/u01/postgres/postgres/9.0-pgdg/bin/64
-bash-3.00$
-bash-3.00$ export PATH=/u01/postgres/postgres/9.0-pgdg/bin/64:/usr/bin:/opt/EMCpower/bin:/etc/emc/bin:/etc
-bash-3.00$
-bash-3.00$ pg_ctl -D /u01/postgres/postgres/9.0-pgdg/data -l logfile start
server starting
-bash-3.00$
-bash-3.00$ ps -ef|grep postgres
postgres 22692 21565   0 18:58:47 pts/1       0:00 ps -ef
postgres 22657 22652   0 18:58:37 ?           0:00 /u01/postgres/postgres/9.0-pgdg/bin/64/postgres -D /u01/postgres/postgres/9.0-p
postgres 22652     1   0 18:58:37 pts/1       0:00 /u01/postgres/postgres/9.0-pgdg/bin/64/postgres -D /u01/postgres/postgres/9.0-p
postgres 22655 22652   0 18:58:37 ?           0:00 /u01/postgres/postgres/9.0-pgdg/bin/64/postgres -D /u01/postgres/postgres/9.0-p
postgres 22656 22652   0 18:58:37 ?           0:00 /u01/postgres/postgres/9.0-pgdg/bin/64/postgres -D /u01/postgres/postgres/9.0-p
postgres 21565 21534   0 18:55:18 pts/1       0:00 -bash
postgres 21534 21533   0 18:55:07 ?           0:00 /usr/lib/ssh/sshd
postgres 22654 22652   0 18:58:37 ?           0:00 /u01/postgres/postgres/9.0-pgdg/bin/64/postgres -D /u01/postgres/postgres/9.0-p
postgres 22693 21565   0 18:58:47 pts/1       0:00 grep postgres
-bash-3.00$


Connecting to psql

-bash-3.00$ export PATH=/u01/postgres/postgres/9.0-pgdg/bin/64:/usr/bin:/opt/EMCpower/bin:/etc/emc/bin:/etc
-bash-3.00$
-bash-3.00$ psql postgres
psql (9.0.4)
Type "help" for help.

postgres=#


]]]]]

Important Configuration Files:
postgresql.conf (under /u01/postgres/postgres/9.0-pgdg/data)
listen_addresses : from which address server will respond

pg_hba.conf (under /u01/postgres/postgres/9.0-pgdg/data)
host based authentication

                    [[[[[


PostgreSQL: Installation


I have installed PostgreSQL 9.0.4 in Sun Solaris platform. The installation steps are as below:


11.      Download binary (you can also install PostgreSQL from source)
  or    http://www.postgresql.org/download/  -> Downloads  -> Solaris  -> download  -> v9.0.4  ->    
         solaris -> solaris10  -> sparc  -> postgresql-9.0.4-S10.sparc-64.tar.bz2 

22.      Create an OS user (here postgresql, you can use any name, better to use group)

33.      create a directory: /u01/postgres and copy the binary here

44.      bunzip2 < postgresql-9.0.4-S10.sparc-64.tar.bz2 | tar xpf -

55      -bash-3.00$ echo $PATH
  /usr/bin:/opt/EMCpower/bin:/etc/emc/bin:/etc

 Add “/u01/postgres/postgres/9.0-pgdg/bin/64” infront of “/usr/bin”

 -bash-3.00$ export PATH=/u01/postgres/postgres/9.0-  
   pgdg/bin/64:/usr/bin:/opt/EMCpower/bin:/etc/emc/bin:/etc

  -bash-3.00$ echo $PATH
   /u01/postgres/postgres/9.0-pgdg/bin/64:/usr/bin:/opt/EMCpower/bin:/etc/emc/bin:/etc
  -bash-3.00$

Important:
Make sure (install dir) /u01/postgres/postgres/9.0-pgdg/bin is in your PATH *before* /usr/bin, otherwise default directories of  PostgreSQL 8.1 binaries will be invoked and used.
If you install the 64bit package, these files will install in subdirectories bin/64 and lib/64 rather than bin and lib; adjust your PATH accordingly.  This also means that it's possible to install both 32 bit and 64 bit PostgreSQL on the same system.


Sunday, July 15, 2012

Oracle: 10g Database Installation in VirtualBox


-  Download Oracle Database 10.2.0.1.0 and Patchset 10.2.0.5.0 (Patch 8202632).
-  Add doownload location in Shared Folder from VirtualBox (Settings->Shared Folders -> Add Shared Folder -> Folder Path)
-  Start Oracle Linux in VirtualBox
-  Login as Root
-  in /media , you can get and access the "Shared Folder"

Checking the Hardware Requirements
------------------------------------------------------------------------
The system must meet the following minimum hardware requirements:
   * At least 1024 MB of physical RAM
   * The relationship between the available RAM and the required swap space.

Available RAM                                   Swap Space Required
-----------------------------------             ---------------------------------
Between 1024 MB and 2048 MB           1.5 times the size of RAM
Between 2049 MB and 8192 MB           Equal to the size of RAM
More than 8192 MB                           0.75 times the size of RAM

 * 400 MB of disk space in the /tmp directory
 * Between 1.5 GB and 3.5 GB of disk space for the Oracle software, depending on the installation type
 * 1.2 GB of disk space for a preconfigured database that uses file system storage (optional)


To determine the physical RAM size, enter the following command:
# grep MemTotal /proc/meminfo

To determine the size of the configured swap space, enter the following command:
# grep SwapTotal /proc/meminfo

To determine the available RAM and swap space, enter the following command:
# free

To determine the amount of free disk space available on the system, enter the following command:
# df -k

To determine whether the system architecture can run the software, enter the following command:
# grep "model name" /proc/cpuinfo

This command displays the processor type. Verify that the processor architecture matches the Oracle software release that you want to install. If you do not see the expected output, then you cannot install the software on this system.


Checking the Software Requirements
------------------------------------------------------------------------------
The system must meet the following minimum software requirements, depending on the distribution and version of your operating system:

#   The operating system must be one of the following:

    * Red Hat Enterprise Linux 3.0 (Update 3 or later)
    * Red Hat Enterprise Linux 4.0
    * SUSE Linux Enterprise Server 9.0
    * Asianux 1.0
    * Asianux 2.0

#   The system must be running the following (or later) kernel version:

    *  Red Hat Enterprise Linux 3.0 and Asianux 1.0
        2.4.21-27.EL
    
    *  Red Hat Enterprise Linux 4.0 and Asianux 2.0
        2.6.9-5.0.5.EL
  

#   The following packages (or later versions) must be installed:

    *  Red Hat Enterprise Linux 3.0 and 4.0, and Asianux 1.0 and Asianux 2.0
        make-3.79.1
        gcc-3.2.3-34
        glibc-2.3.2-95.20
        compat-db-4.0.14-5
        compat-gcc-7.3-2.96.128
        compat-gcc-c++-7.3-2.96.128
        compat-libstdc++-7.3-2.96.128
        compat-libstdc++-devel-7.3-2.96.128
        openmotif21-2.1.30-8
        setarch-1.3-1


To determine which version of the operating system is installed, enter the following command:
# cat /etc/issue

To determine whether the required kernel is installed, enter the following command :
# uname -r

To determine whether the required packages are installed, enter commands similar to the following:
# rpm -q package_name 


Creating Required Operating System Groups and Users
---------------------------------------------------------------------------------------------
The following local operating system groups and users are required if you are installing Oracle Database:

    *  The Oracle Inventory group (oinstall)
    *  The OSDBA group (dba)
    *  The Oracle software owner (oracle)
    *  An unprivileged user (nobody)

   1.  To determine whether the oinstall group exists, enter the following command:
        # more /etc/oraInst.loc

        If the oraInst.loc file exists, then the output from this command is similar to the following:

        inventory_loc=/u01/app/oracle/oraInventory
        inst_group=oinstall

   2.  To determine whether the dba group exists, enter the following command:
        # grep dba /etc/group

   3.  If necessary, enter the following commands to create the oinstall and dba groups:
      # /usr/sbin/groupadd oinstall
      # /usr/sbin/groupadd dba

   4.  To determine whether the oracle user exists and belongs to the correct groups, enter the following command:
      # id oracle

 The output should be similar to the following, indicating that oinstall is the primary group and dba is a secondary group:
      uid=440(oracle) gid=200(oinstall) groups=201(dba),202(oper)

   5.  If necessary, complete one of the following actions:
       *  If the oracle user exists, but its primary group is not oinstall or it is not a member of the dba group, then enter the following command:
          # /usr/sbin/usermod -g oinstall -G dba oracle
       
       *  If the oracle user does not exist, enter the following command to create it:
          # /usr/sbin/useradd -g oinstall -G dba oracle
        This command creates the oracle user and specifies oinstall as the primary group and dba as the secondary group.

   6.  Enter the following command to set the password of the oracle user:
         # passwd oracle

   7.  To determine whether the nobody user exists, enter the following command:
         # id nobody

        If the nobody user does not exist, then enter the following command to create it:
        # /usr/sbin/useradd nobody


Configuring Kernel Parameters
-------------------------------------------------------------------------------------------
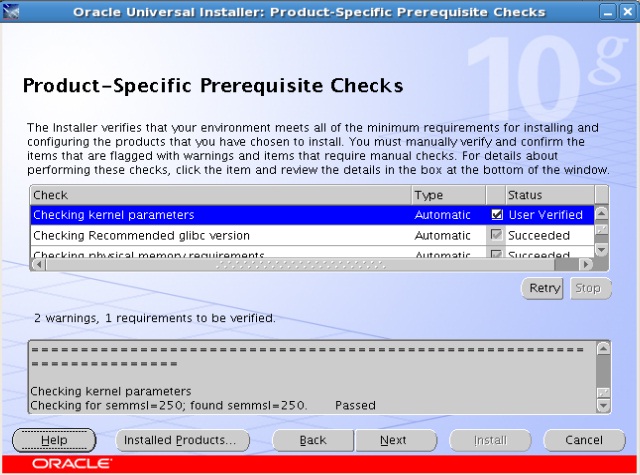
Verify that the kernel parameters shown in the following table are set to values greater than or equal to the recommended value shown. The procedure following the table describes how to verify and set the values.


Parameter Value File
semmsl 250 /proc/sys/kernel/sem
semmns 32000
semopm 100
semmni 128
shmall 2097152 /proc/sys/kernel/shmall
shmmax Half the size of physical memory (in bytes) /proc/sys/kernel/shmmax
shmmni 4096 /proc/sys/kernel/shmmni
file-max 65536 /proc/sys/fs/file-max
ip_local_port_range Minimum: 1024 /proc/sys/net/ipv4/ip_local_port_range
Maximum: 65000
rmem_default 262144 /proc/sys/net/core/rmem_default
rmem_max 262144 /proc/sys/net/core/rmem_max
wmem_default 262144 /proc/sys/net/core/wmem_default
wmem_max 262144 /proc/sys/net/core/wmem_max


If the value of any kernel parameter is different from the recommended value, then create or edit the /etc/sysctl.conf file and add or edit lines similar to the following:
       #  vi /etc/sysctl.conf 


kernel.shmall = 2097152
kernel.shmmax = 2147483648
kernel.shmmni = 4096
kernel.sem = 250 32000 100 128
fs.file-max = 65536
net.ipv4.ip_local_port_range = 1024 65000
rmem_default = 262144
rmem_max = 262144
wmem_default = 262144
wmem_max = 262144

>>>>  Restart System to get effect


Set Shell Limits for the oracle User
---------------------------------------------------------------------------------------

Shell Limit                                                                    Item in limits.conf Hard Limit
--------------------------------                                                   ------------------------       ----------------
Maximum number of open file descriptors                               nofile            65536
Maximum number of processes available to a single user       nproc            16384


To increase the shell limits:

   1. Add the following lines in the /etc/security/limits.conf file:

      oracle           soft      nproc     2047
      oracle           hard     nproc    16384
      oracle           soft      nofile    1024
      oracle           hard     nofile    65536

   2. Add the following line to the /etc/pam.d/login file, if it does not already exist:

      session    required     /lib/security/pam_limits.so

   3.  Depending on the oracle user's default shell, make the following changes to the default shell startup file:

          *  For the Bourne, Bash, or Korn shell, add the following lines in the /etc/profile file (or the /etc/profile.local file on SUSE systems):

            if [ $USER = "oracle" ]; then
                    if [ $SHELL = "/bin/ksh" ]; then
                          ulimit -p 16384
                          ulimit -n 65536
                    else
                          ulimit -u 16384 -n 65536
                    fi
            fi


          *   For the C shell, add the following lines in the /etc/csh.login file (or the /etc/csh.login.local file on SUSE systems):

            if ( $USER == "oracle" ) then
                    limit maxproc 16384
                    limit descriptors 65536
            endif


Creating Required Directories
------------------------------------------------------------
Create directories with names similar to the following, and specify the correct owner, group, and permissions for them:

    *  The Oracle base directory
    *  An optional Oracle data file directory (optional)

The Oracle base directory must have 3 GB of free disk space, or 4 GB of free disk space if you choose not to create a separate Oracle data file directory.

# mkdir -p /mount_point/app/oracle_sw_owner
# chown -R oracle:oinstall /mount_point/app/oracle_sw_owner
# chmod -R 775 /mount_point/app/oracle_sw_owner

For example, if the mount point you identify is /u01 and oracle is the user name of the Oracle software owner, then the recommended Oracle base directory path is as follows:

/u01/app/oracle


Configuring the oracle User's Environment
------------------------------------------------------------------------

-   You run Oracle Universal Installer from the oracle account. However, before you start Oracle Universal Installer, you must configure the environment of the oracle user. 


-   Set the default file mode creation mask (umask) to 022 in the shell startup file.
-   Set the DISPLAY environment variable.


-   To set the oracle user's environment:


   1.  Start a new terminal session, for example, an X terminal (xterm).
   2.  Enter the following command to ensure that X Window applications can display on this system:
        $ xhost fully_qualified_remote_host_name


-   To determine the default shell for the oracle user, enter the following command:
      $ echo $SHELL


-    Enter or edit the following line in the shell startup file, specifying a value of 022 for the default file mode creation mask:
       umask 022


-   If the ORACLE_SID, ORACLE_HOME, or ORACLE_BASE environment variable is set in the file, then remove the corresponding lines from the file.


-   If you are not installing the software on the local system, then enter a command similar to the following to direct X applications to display on the local system:
    *   Bourne, Bash, or Korn shell:
        $ DISPLAY=local_host:0.0 ; export DISPLAY


    *   C shell:
        % setenv DISPLAY local_host:0.0


-    Enter the following commands to ensure that the ORACLE_HOME and TNS_ADMIN environment variables are not set:


      Bourne, Bash, or Korn shell:
      $ unset ORACLE_HOME
      $ unset TNS_ADMIN


      C shell:
      % unsetenv ORACLE_HOME
      % unsetenv TNS_ADMIN


-   To verify that the environment has been set correctly, enter the following commands:
      $ umask
      $ env | more


-    Verify that the umask command displays a value of 0022, 022, or 22 and the environment variables that you set in this section have the correct values.


Note: for Redhat Linux 5, when initiating runInstaller, it will fail due to system requirements check.
So, you need to replace 5 with 4 in "/etc/redhat-release". After finishing installation, you need to revert back to original value.


    Select Advanced Installation, and click Next


    Modify Inventory Location as you desire:


    Select Installation type as per your requirement:


    Specify Home location:


    Select "Install Database Software only":

    Click Install:


Wednesday, July 11, 2012

Oracle: Required Downtime to Upgrade


-   It is very difficult to estimate the time required to upgrade the database from one version to another.

-   While upgrading database either manually or using DBUA the time taken for the upgrade is relatively independent from the size of the database. It rather depends upon the amount of work to be done to load the data dictionary of the target version.

-   For example, upgrading a database from 10gR1 to 10gR2 will takes less time comparatively than an upgrade from 9iR2 to 10gR2, because there are fewer dictionary changes to move from 10gR1 to 10gR2 than 9iR2 to 10gR2.

-   As a part of upgrade all PL/SQL is invalidated, therefore a database with more number of objects to be recompiled will take more time to upgrade than a database with fewer objects.

-   The time taken to upgrade a database does not depend on size of the database, because during upgrade the data blocks are not touched. The time consuming part is the recompilation part and this depends on the number of objects to recompile and the CPU power, one good idea will be to recompile in parallel to save time, the DBUA offers this by allowing to choose the number of parallel threads if there is more than one CPU, the same can be accomplished while running utlrp.sql manually by calling it with a value of parallelism.

-   During the upgrade, optimizer statistics are collected for dictionary tables that lack statistics. This statistics collection can be time consuming for databases with a large number of dictionary tables, but statistics gathering only occurs for those tables that lack statistics or are significantly changed during the upgrade. To decrease the amount of downtime incurred when collecting statistics, you can collect statistics prior to performing the actual database upgrade.

-   If the database is running in archive log mode then it is a good idea to turn off archiving for the duration of upgrade to reduce the time required to complete the upgrade.

-   The best method to determine the approximate time required to upgrade an instance is to test the upgrade on an exact clone of the instance on similar hardware with a similar load.  This can provide a reasonable approximation on how long to expect and if any issues may be encountered in the process.


Oracle: Upgrade Downtime Minimization


***    Migration in NOARCHIVELOG mode will reduce the upgrade time and hence downtime.

NOTE: NOARCHIVELOG should NOT be used if any log-based replication technology is used. Log-based technologies include Active Data Guard, Oracle GoldenGate, XStream, Oracle Streams, Data Guard (Redo Apply and SQL Apply), Asynchronous Change Data Capture(CDC) and Audit Vault redo collector.

***    Main function of the migration is to create a new data dictionary. The upgrade can be tested for most of the migration functionality by using a copy of the databases SYSTEM tablespace and ROLLBACK SEGMENT tablespaces and marking all other tablespaces OFFLINE. This allows realistic timings to be obtained without having to copy an entire database.

***    Make all tablespaces OFFLINE NORMAL or make READ ONLY  except for SYSTEM, SYSAUX (When migrating to 10gR2 or higher) and those containing rollback segments prior to migration. This way if migration fails only the SYSTEM and rollback datafiles need to be restored rather than the entire database.
Note: You must OFFLINE the TABLESPACE as migrate does not allow OFFLINE files in an ONLINE tablespace.

***    When upgrading to Oracle Database 10g, optimizer statistics are collected for dictionary tables that lack statistics. This statistics collection can be time consuming for databases with a large number of dictionary tables, but statistics gathering only occurs for those tables that lack statistics or are significantly changed during the upgrade.

To decrease the amount of downtime incurred when collecting statistics, you can collect statistics prior to performing the actual database upgrade.

Should use the DBMS_STATS.GATHER_SCHEMA_STATS procedure to gather statistics for your 9.2.0.X database.

To verify the schema with stale statistics, refer Note 560336.1 Script to Check Schemas with Stale Statistics
Note : Please test before upgrading production database by upgrading a test database.


Source:
Best Practices to Minimize Downtime During Upgrade [ID 455744.1]


Oracle: Upgrade Compatibility Matrix


For Upgrade to 11.2.x

Minimum Version of the database that can be directly upgraded to Oracle 11g Release 2


Source Database
Destination Database
9.2.0.8   (or higher)
11.2.x
10.1.0.5 (or higher)
11.2.x
10.2.0.2 (or higher)
11.2.x
11.1.0.6 (or higher)
11.2.x


Following database version requires Indirect Upgrade Path

Source Database
Upgrade Path
Destination Database
7.3.3 (or lower)
=> 7.3.4.0 => 9.2.0.8 =>
11.2.x
8.0.5 (or lower)
=> 8.0.6.x => 9.2.0.8 =>
11.2.x
8.1.7 (or lower)
=> 8.1.7.4 => 10.2.0.4 =>
11.2.x
9.0.1.3 (or lower)
=> 9.0.1.4 => 10.2.0.4 =>
11.2.x
9.2.0.7 (or lower)
=> 9.2.0.8 =>
11.2.x


For Upgrade to 11.1.x

Minimum Version of the database that can be directly upgraded to Oracle 11g Release 1


Source Database
Destination Database
9.2.0.4   (or higher)
11.1.x
10.1.0.2 (or higher)
11.1.x
10.2.0.1 (or higher)
11.1.x


The following database version will require an indirect upgrade path.

Source Database
Upgrade Path
Destination Database
7.3.3 (or lower)
=> 7.3.4.0 => 9.2.0.8 =>
11.1.x
8.0.5 (or lower)
=> 8.0.6.x => 9.2.0.8 =>
11.1.x
8.1.7 (or lower)
=> 8.1.7.4 => 9.2.0.8 =>
11.1.x
9.0.1.3 (or lower)
=> 9.0.1.4 => 9.2.0.8 =>
11.1.x
9.2.0.3 (or lower)
=> 9.2.0.4.0 =>
11.1.x


For Upgrade to 10.2.x


Minimum Version of the database that can be directly upgraded to Oracle 10.2.x 


Source Database
Destination Database
8.1.7.4   (or higher)
10.2.x
9.0.1.4   (or higher)
10.2.x
9.2.0.4   (or higher)
10.2.x
10.1.0.2 (or higher)
10.2.x


The following database version will require an indirect upgrade path. 


Source Database
Upgrade Path
Destination Database
7.3.3 (or lower)
=> 7.3.4 => 8.1.7 =>8.1.7.4 =>
10.2.x
7.3.4 (or lower)
=>8.1.7 => 8.1.7.4 =>
10.2.x
8.0.n (or lower)
=>8.1.7 => 8.1.7.4 =>
10.2.x
8.1.n (or lower)
=>8.1.7 => 8.1.7.4 =>
10.2.x


For Upgrade to 10.1.x

Minimum Version of the database that can be directly upgraded to Oracle 10.1.x 

Source Database
Destination Database
8.0.6  (or higher)
10.1.x
8.1.7  (or higher)
10.1.x
9.0.1 (or higher)
10.1.x
9.2.0 (or higher)
10.1.x


The following database version will require an indirect upgrade path.

Source Database
Upgrade Path
Destination Database
7.3.4 (or lower)
=> 8.0.6 =>
10.1.x
8.0.5 (or lower)
=> 8.0.6 =>
10.1.x
8.1.6 (or lower)
=> 8.1.7 =>
10.1.x


For Upgrade to 9.2.x

Minimum Version of the database that can be directly upgraded to Oracle 9.2.x 

Source Database
Destination Database
7.3.4 (or higher)
9.2.x
8.0.6 (or higher)
9.2.x
8.1.7 (or higher)
9.2.x
9.0.1 (or higher)
9.2.x


The following database version will require an indirect upgrade path

Source Database
Upgrade Path
Destination Database
7.3.3 (or lower)
=> 7.3.4 =>
9.2.x
8.0.5 (or lower)
=> 8.0.6 =>
9.2.x
8.1.6 (or lower)
=> 8.1.7 =>
9.2.x


Note:
You cannot upgrade database binaries from one major release to another.
For example : You cannot upgrade the binaries from 10.1.0.2.0 to 10.2.0.1.0. Major releases must be installed in a separate oracle home. You cannot install 10.2.0.x on any other major release to upgrade the oracle home. 


Source:
Database Server Upgrade/Downgrade Compatibility Matrix [ID 551141.1]