. Required DB Software: .
1. 10gr2_db_sol.cpio (Base
release- Oracle Database 10g 10.2.0.1.0)
2. p8202632_10205_SOLARIS64.zip (Oracle Database 10g Release 2 Patch Set
4 10.2.0.5.0)
3. p6880880_102000_SOLARIS64.zip
(OPatch
10.2.0.5.1, the Oracle Interim Patching Tool.)
4. p11724962_10205_SOLARIS64.zip (Patch Set Update 10.2.0.5.3) Login as ROOT user:
Checking Hardware Requirements:
RAM
|
Swap Space
|
Between 1024 MB and 2048 MB
|
1.5 times the size of RAM
|
Between 2049 MB and 8192 MB
|
Equal to the size of RAM
|
More than 8192 MB
|
0.75 times the size of RAM
|
·
400 MB of disk
space in the
/tmp directory
·
Minimum 30 GB of local disk
space in
/u01 mount
point for the Oracle software (Recommended
to have 68GB LUN)
·
ASM storage as per requirement
1.
To
determine the physical RAM size, enter the following command:
# /usr/sbin/prtconf | grep "Memory
size"
2.
To determine the size of the configured swap space, enter the
following command:
# /usr/sbin/swap -s
3.
To determine the amount of disk space available in the
/tmp directory, enter the following command:# df -h /tmp
# df -h
# /bin/isainfo -kv
Note:
The
following is the expected output of this command:
If
you do not see the expected output, then you cannot install the software on
this system.
|
Checking Software Requirements:
Verify
that the following software is installed on the system
# uname –r
5.10
2.
To determine whether the required packages are installed, enter a
command similar to the following:
# pkginfo -i SUNWarc SUNWbtool SUNWhea
SUNWlibm SUNWlibms SUNWsprot SUNWtoo SUNWi1of SUNWi1cs SUNWi15cs SUNWxwfnt
3.
Make sure that system administrators updated the OS with latest patch.
Checking the Network Setup (Configuring Name Resolution)
Verify that the /etc/hosts file is used for name resolution. You can do this by checking the hosts file entry in thensswitch.conffile as follows: The output of this command should contain an entry for files.
# cat /etc/nsswitch.conf | grep hosts
Verify that the host name has been set by using the hostname command as follows:
# hostname
Verify that the domain name has not been set dynamically by using the domainname command as follows: This command should not return any results.
# domainname
Verify that the hosts file contains the fully qualified host name by using the following command: If the /etc/hosts file does not contain the fully qualified host name, then open the file and make the required changes in it.
# cat /etc/hosts | grep `eval hostname`
For example:
127.0.0.1 localhost localhost.localdomain
192.168.100.16 hostname hostname.mycompany.com
192.168.100.17 hostname-vip hostname-vip.mycompany.com
Creating Required Operating System Groups and UsersCreate the Oracle Inventory group by entering the following command:
# /usr/sbin/groupadd –g 100 oinstallCreate the Oracle OSDBA group by entering the following command:
# /usr/sbin/groupadd –g 101 dbaCreate the Oracle OSOPER group by entering the following command:
# /usr/sbin/groupadd –g 102 oper
Creating the Oracle Software Owner User
# /usr/sbin/useradd –u 200 -g oinstall -G dba,oper –d /export/home/oracle –s /bin/bash oracle
# passwd oracle
3.
To check oraInventory Location:
# more
/var/opt/oracle/oraInst.loc
inventory_loc=/u01/oracle/oraInventory
inst_group=oinstall
inventory_loc=/u01/oracle/oraInventory
inst_group=oinstall
Verifying that the User nobody Exists
# id nobody
If this command displays information about the nobody user, then you do not have to create that
user.
2.
If the nobody user does not exist, then enter the following command to create
it:
# /usr/sbin/useradd nobody
Configuring Kernel Parameters
/etc/system file for a specific kernel parameter.
Parameter
|
Replaced
by Resource Control
|
Recommended
Value
|
noexec_user_stack
|
N/A
|
1
|
project.max-sem-ids
|
256
|
|
project.max-shm-memory
|
4294967295 (Depends on the requirements)
|
|
project.max-shm-ids
|
256
|
a.
Create a new project on the system for oracle
# projadd oracle
b.
Add the following line at the end of
/etc/user_attr
file.oracle::::project=oracle
c.
Add the following line at the end of /
etc/system file.set noexec_user_stack=1
d.
Run the following commands to put values for resource controls
prctl -n project.max-sem-ids -v 256 -r -i project oracle
projmod -s -K "project.max-sem-ids=(priv,256,deny)" oracle
prctl -n project.max-shm-ids -v 256 -r -i project oracle
projmod -s -K "project.max-shm-ids=(priv,256,deny)" oracle
prctl -n project.max-shm-memory -v 4gb -r -i project oracle
projmod -s -K "project.max-shm-memory=(priv,4gb,deny)" oracle
Note: prctl is used
to do the above tasks online. And projmod
is used for persistent settings.
|
prctl -n project.max-sem-ids -i project oracle
prctl -n project.max-shm-ids -i project oracle
prctl -n project.max-shm-memory -i project oracle
Creating an Oracle Base & Oracle Home Directory
1.
Generally, to install Oracle Software, we require /u01 mount point.
2.
Enter commands similar to the following to create the recommended
subdirectories in the mount point directory (/u01) and set the appropriate owner, group, and permissions on
them:
# mkdir -p /u01/oracle/product/10.2.0/db
# chown -R oracle:oinstall /u01/oracle
# chmod -R 755 /u01/oracle (less secured) OR
# chmod -R 750 /u01/oracle (more secured)
Note: If there are no OS users who use Oracle Libraries or Clients
then the directory should be restricted.
|
Preparing Disks for an Automatic Storage Management Installation
While requesting disk for ASM from System Administrators ensure that all disks have the following characteristics.
·
All
disks should be under location -> /dev/rdsk/asm (Recommended,
Might Change)
·
Each
disk has to be same size LUN-> 68GB (Recommended)
·
Each
disk owner should like -> chown -R
oracle:dba dev/rdsk/asm/disk01
·
Each
disk mode should be -> chmod 660
/dev/rdsk/asm/disk01
Consider the below file characteristics while
making decision about RAID LEVEL.
File
Type
|
File
Characteristics
|
Online
Redo Log Files
|
Performance
Intensive (Fault Tolerance reduced by multiplexing)
|
Control
Files
|
Performance
Intensive + Fault Tolerance
|
System
Tablespace
|
High
Available
|
Undo
Tablespace
|
High
Available
|
Other
Tablespaces
|
Optimum
fault tolerance and performance
|
Archive
Log Files
|
Fault
Tolerance
|
Note: Raid 5: General Purpose; applicable for any sized database.
Raid 1 + 0: Only applicable for small
and very critical database.
|
Configuring the oracle user’s Environment
Before start Oracle Universal Installer, configure the environment of the oracle user by editing the .bash_profile file as follows and run the bash profile using command (#. .bash_profile).
.bash_profile sample
unset ORACLE_SID;
unset PATH;
ulimit -n 65535
ulimit -s unlimited
umask 022
EDITOR=vi; export EDITOR;
PERL5LIB=/usr/perl5/5.6.1/lib; export PERL5LIB;
DISPLAY=LOCAL_HOST:0.0; export DISPLAY
#ORACLE_SID=PROD; export ORACLE_SID
ORACLE_BASE=/u01/oracle
ORACLE_ADMIN=/u01/oracle/admin
ORACLE_HOME=/u01/oracle/product/10.2.0/db
LD_LIBRARY_PATH=$ORACLE_HOME/lib
LD_LIBRARY_PATH_64=$ORACLE_HOME/lib
export ORACLE_BASE ORACLE_HOME LD_LIBRARY_PATH LD_LIBRARY_PATH_64 ORACLE_ADMIN
PATH=$PATH:$ORACLE_HOME/bin:/usr/ccs/bin:/usr/bin:/etc:/usr/openwin/bin:/usr/sbin:/usr/ucb/bin:/usr/local/bin/:/usr/sfw/bin:$ORACLE_HOME/OPatch
export PATH
alias sql+="sqlplus '/ as sysdba'"
alias ll="ls -ltr"
PS1='\u@\h($ORACLE_SID):`pwd`# '
export PS1
. Installation .
$ cpio -idcmv < filename.cpio
Change
directory to database directory of
oracle software and enter the following command:$ ./runInstaller
Run two scripts during oracle installation with root user


Installing Pathches
It is recommended to install patches before database installation. To extract the Oracle Patch files, enter the following command:
$ unzip p5337014_10203_LINUX.zip -- for 10.2.0.3 version
$ p8202632_10205_SOLARIS64.zip -- for 10.2.0.5 version (Patch Set 4)
Change
directory to Disk1 and enter the following command to install patch.$ ./runInstaller


Check installed patch from OS:
oracle@hostname():/u01/Software#
oracle@hostname():/u01/Software#
opatch lsinventory
Invoking
OPatch 10.2.0.4.9
Oracle
Interim Patch Installer version 10.2.0.4.9
Copyright
(c) 2009, Oracle Corporation. All rights
reserved.
Oracle
Home :
/u01/oracle/product/10.2.0/db
Central
Inventory : /u01/oracle/oraInventory
from : /var/opt/oracle/oraInst.loc
OPatch
version : 10.2.0.4.9
OUI
version : 10.2.0.5.0
OUI
location :
/u01/oracle/product/10.2.0/db/oui
Log
file location :
/u01/oracle/product/10.2.0/db/cfgtoollogs/opatch/opatch2013-05-20_14-38-59PM.log
Patch
history file:
/u01/oracle/product/10.2.0/db/cfgtoollogs/opatch/opatch_history.txt
Lsinventory
Output file location : /u01/oracle/product/10.2.0/db/cfgtoollogs/opatch/lsinv/lsinventory2013-05-20_14-38-59PM.txt
--------------------------------------------------------------------------------
Installed
Top-level Products (2):
Oracle
Database 10g
10.2.0.1.0
Oracle
Database 10g Release 2 Patch Set 4 10.2.0.5.0
There
are 2 products installed in this Oracle Home.
There
are no Interim patches installed in this Oracle Home.
--------------------------------------------------------------------------------
OPatch
succeeded.
oracle@hostname():/u01/Software#
Modifying the listener.ora File
Create the listener.ora file with below information to create two listeners LISTENER1 and LISTENER2 for service SID.


Installation of Latest version of OPATCH Utility
1. copy "p6880880_102000_SOLARIS64.zip" to
ORACLE_HOME
2. mv OPatch OPatch.backup
3. unzip p6880880_102000_SOLARIS64.zip
4. opatch lsinventory
Installation of PSU 10.2.0.5.3
p11724962_10205_SOLARIS64.zip (Patch Set Update 10.2.0.5.3)
One-off Patch Conflict Detection and Resolution
1. Determine
whether any currently installed one-off patches
conflict with the PSU patch as follows:
unzip p11724962_10205_<platform>.zip
opatch prereq CheckConflictAgainstOHWithDetail
-phBaseDir ./11724962
oracle@hostname():/u01/Software#
oracle@hostname():/u01/Software#
opatch prereq CheckConflictAgainstOHWithDetail -phBaseDir ./11724962
Invoking OPatch 10.2.0.5.1
Oracle Interim Patch Installer
version 10.2.0.5.1
Copyright (c) 2010, Oracle
Corporation. All rights reserved.
PREREQ session
Oracle Home :
/u01/oracle/product/10.2.0/db
Central Inventory :
/u01/oracle/oraInventory
from :
/var/opt/oracle/oraInst.loc
OPatch version : 10.2.0.5.1
OUI version : 10.2.0.5.0
OUI location : /u01/oracle/product/10.2.0/db/oui
Log file location :
/u01/oracle/product/10.2.0/db/cfgtoollogs/opatch/opatch2013-05-20_15-53-00PM.log
Patch history file:
/u01/oracle/product/10.2.0/db/cfgtoollogs/opatch/opatch_history.txt
Invoking prereq
"checkconflictagainstohwithdetail"
Prereq "checkConflictAgainstOHWithDetail" passed.
OPatch succeeded.
oracle@hostname():/u01/Software#
2. The report will indicate the patches that conflict
with PSU 11724962 and the patches for which PSU 11724962 is a superset. Refer
to "Patch Set Updates Patch Conflict Resolution" in My Oracle Support
Note 854428.1
Patch Set Updates for Oracle Products.
Note
that Oracle proactively provides PSU 10.2.0.5.3 one-off patches for common
conflicts
3. Use
My Oracle Support Note 1061295.1 Patch Set Updates - One-off Patch
Conflict Resolution to determine, for each conflicting patch, whether a
conflict resolution patch is already available, and if you need to request a
new conflict resolution patch or if the conflict may be ignored
4. When all the PSU 10.2.0.5.3 one-off patches that you have requested are
available at My Oracle Support, proceed with Section 3.2,
"Patch Installation Instructions".
Patch
Installation
1. Shutdown
all instances and listeners
2. unzip
p11724962_10205_<platform>.zip
3. cd
11724962
4. opatch
apply
oracle@hostname():/u01/Software/11724962#
oracle@hostname():/u01/Software/11724962# opatch
apply
Invoking OPatch 10.2.0.5.1
Oracle Interim Patch Installer version 10.2.0.5.1
Copyright (c) 2010, Oracle Corporation. All rights reserved.
Oracle Home
: /u01/oracle/product/10.2.0/db
Central Inventory : /u01/oracle/oraInventory
from : /var/opt/oracle/oraInst.loc
OPatch version
: 10.2.0.5.1
OUI version
: 10.2.0.5.0
OUI location
: /u01/oracle/product/10.2.0/db/oui
Log file location :
/u01/oracle/product/10.2.0/db/cfgtoollogs/opatch/opatch2013-05-20_16-14-57PM.log
Patch history file:
/u01/oracle/product/10.2.0/db/cfgtoollogs/opatch/opatch_history.txt
ApplySession applying interim patch '11724962' to
OH '/u01/oracle/product/10.2.0/db'
Running prerequisite checks...
Patch 11724962: Optional component(s) missing : [
oracle.rdbms.dv, 10.2.0.5.0 ] , [ oracle.rdbms.dv.oc4j, 10.2.0.5.0 ]
Provide your email address to be informed of
security issues, install and
initiate Oracle Configuration Manager. Easier for
you if you use your My
Oracle Support Email address/User Name.
Visit http://www.oracle.com/support/policies.html
for details.
Email address/User Name:
You have not provided an email address for
notification of security issues.
Do you wish to remain uninformed of security
issues ([Y]es, [N]o) [N]: Y
OPatch detected non-cluster Oracle Home from the
inventory and will patch the local system only.
Please shutdown Oracle instances running out of
this ORACLE_HOME on the local system.
(Oracle Home = '/u01/oracle/product/10.2.0/db')
Is the local system ready for patching? [y|n]
y
User Responded with: Y
Backing up files and inventory (not for
auto-rollback) for the Oracle Home
Backing up files affected by the patch '11724962'
for restore. This might take a while...
Backing up files affected by the patch '11724962'
for rollback. This might take a while...
Execution of 'sh
/u01/Software/11724962/custom/scripts/pre -apply 11724962 ':
Return Code = 0
Patching component oracle.rdbms, 10.2.0.5.0...
Updating archive file
"/u01/oracle/product/10.2.0/db/lib/libserver10.a" with "lib/libserver10.a/kcbl.o"
Copying file to
"/u01/oracle/product/10.2.0/db/psu/10.2.0.5.3/catpsu.sql"
Copying file to "/u01/oracle/product/10.2.0/db/psu/10.2.0.5.3/catpsu_rollback.sql"
Patching component oracle.rdbms.rsf, 10.2.0.5.0...
Copying file to
"/u01/oracle/product/10.2.0/db/rdbms/mesg/oraus.msb"
Copying file to
"/u01/oracle/product/10.2.0/db/rdbms/mesg/oraus.msg"
Patching component oracle.rdbms.dbscripts,
10.2.0.5.0...
Copying file to
"/u01/oracle/product/10.2.0/db/rdbms/admin/prvtjob.plb"
Copying file to
"/u01/oracle/product/10.2.0/db/cpu/scripts/bug11057369.sql"
Patching component oracle.network.rsf,
10.2.0.5.0...
Updating archive file
"/u01/oracle/product/10.2.0/db/lib/libnnz10.a" with "lib/libnnz10.a/nzu.o"
Copying file to
"/u01/oracle/product/10.2.0/db/lib/libnnz10.so"
Copying file to
"/u01/oracle/product/10.2.0/db/lib32/libnnz10.so"
Patching component oracle.sysman.bsln,
10.2.0.5.0...
Updating jar file
"/u01/oracle/product/10.2.0/db/sysman/jlib/emCORE.jar" with
"/sysman/jlib/emCORE.jar/oracle/sysman/eml/sec/util/RootCert.class"
Updating jar file
"/u01/oracle/product/10.2.0/db/sysman/jlib/emCORE.jar" with
"/sysman/jlib/emCORE.jar/oracle/sysman/eml/sec/util/SecConstants.class"
Running make for target client_sharedlib
Running make for target ioracle
Running make for target client_sharedlib
ApplySession adding interim patch '11724962' to
inventory
Verifying the update...
Inventory check OK: Patch ID 11724962 is
registered in Oracle Home inventory with proper meta-data.
Files check OK: Files from Patch ID 11724962 are
present in Oracle Home.
The local system has been patched and can be
restarted.
OPatch succeeded.
oracle@ibsreco():/u01/Software/11724962#
===========================================================================
To check from OS:
oracle@hostname():/u01/Software/11724962# opatch lsinventory
Invoking OPatch 10.2.0.5.1
Oracle Interim Patch Installer version 10.2.0.5.1
Copyright (c) 2010, Oracle Corporation. All rights reserved.
Oracle Home
: /u01/oracle/product/10.2.0/db
Central Inventory : /u01/oracle/oraInventory
from : /var/opt/oracle/oraInst.loc
OPatch version
: 10.2.0.5.1
OUI version
: 10.2.0.5.0
OUI location
: /u01/oracle/product/10.2.0/db/oui
Log file location :
/u01/oracle/product/10.2.0/db/cfgtoollogs/opatch/opatch2013-05-20_16-21-00PM.log
Patch history file:
/u01/oracle/product/10.2.0/db/cfgtoollogs/opatch/opatch_history.txt
Lsinventory Output file location :
/u01/oracle/product/10.2.0/db/cfgtoollogs/opatch/lsinv/lsinventory2013-05-20_16-21-00PM.txt
--------------------------------------------------------------------------------
Installed Top-level Products (2):
Oracle Database 10g
10.2.0.1.0
Oracle Database 10g Release 2 Patch Set 4 10.2.0.5.0
There are 2 products installed in this Oracle
Home.
Interim patches (1) :
Patch 11724962 : applied on Mon May 20 16:18:40 BDT 2013
Unique Patch ID:
13623473
Created
on 4 Apr 2011, 22:24:50 hrs PST8PDT
Bugs
fixed:
6402302, 10327190, 9150282, 9659614, 8865718, 9949948, 9024850, 8394351
10327179, 8546356, 9711859, 9714832, 9952230, 10248542, 9770451, 9020537
9772888, 8664189, 10091698, 7519406, 9952270, 8771916, 9109487, 9713537
8350262, 11792865, 10010310, 11724962, 11725006, 9390484, 9963497
8544696, 9320130, 10249537, 8211733, 8277300, 9548269, 9337325, 9726739
7602341, 10157402, 8412426
--------------------------------------------------------------------------------
OPatch succeeded.
oracle@hostname():/u01/Software/11724962#
Installing ASM instance and Create Oracle Database
·
Install and run Oracle Cluster Synchronization Service (CSS) by executing the following command
as root user, before creating ASM
instance using dbca tool.
$ /u01/oracle/product/10.2.0/db/bin/localconfig add
root@hostname:[/u01/oracle/product/10.2.0/db]#
/u01/oracle/product/10.2.0/db/bin/localconfig
add
Successfully accumulated
necessary OCR keys.
Creating OCR keys for user
'root', privgrp 'root'..
Operation successful.
Configuration for local CSS has
been initialized
Adding to inittab
Startup will be queued to init
within 30 seconds.
Checking the status of new Oracle
init process...
Expecting the CRS daemons to be
up within 600 seconds.
CSS is active on these nodes.
ibsreco
CSS is active on all nodes.
Oracle CSS service is installed
and running under init(1M)
root@hostname:[/u01/oracle/product/10.2.0/db]#
·
Use database configuration assistance to install ASM and oracle
database.
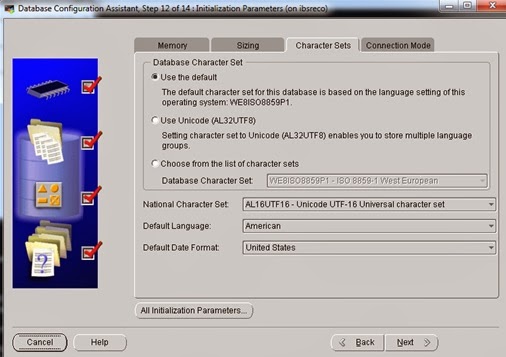
To open Database Configuration
Assistant enter a command similar to the following$dbca
During Database and ASM creation ensure following things:
·
Choose the
ASM redundancy level (External
Redundancy) for each Automatic Storage Management disk group.
·
Create minimum three ASM Disk Groups e.g. DG01, LOG01 and LOG02.
·
Create five online redo log groups with two members. Each log members must
reside in different diskgroups. Each log member size depends on the transaction
behavior (Recommended is 1 log switch in every 15-20 Min).
·
Multiplex
archive log files in two log areas (LOG01 and LOG02).
Multiplex
three Control Files in three different disk groups.
Login to server (using mobiXterm or Exceed)
./dbca


Run DBCA to Create DATABASE


Note: in 10g listener needs to be up to connect to
ASM. So before starting DBCA to create database start DB listener.


End of Installation.
No comments:
Post a Comment